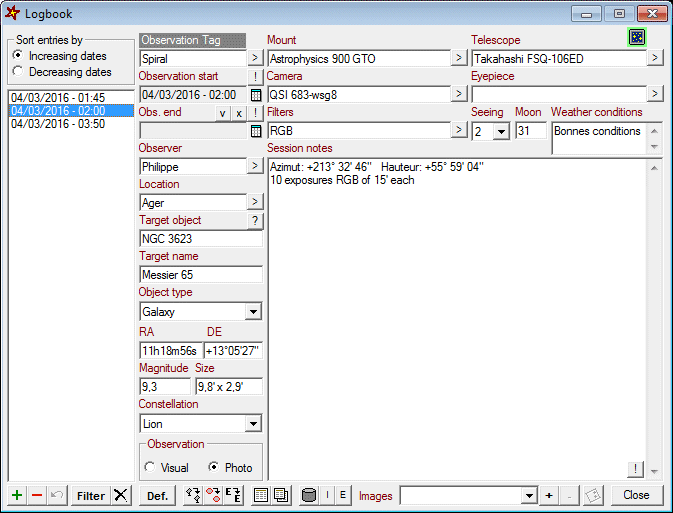
C2A integrates a tool to gather and store notes during observation sessions, then to retrieve them easily. This Observation Logbook includes a certain number of fields on which specific filters can be applied in order to quickly find a particular observation made in the past.
The screenshot below shows the tracking drift analysis window. To get information on one of the components of the window, left-click on it:

The only mandatory field in a logbook entry is the start date and time of the session. This can be insereted into the Session Start field in two ways: either by clicking the small '!' button in which case the current date and time is used, or by clicking the small calendar button on the right side of the field. The end of session date is optional. It can be quickly defined by clicking the small 'V' button. Doing so will make the end date equal to the start date + 12 hours (so around a full night of observation).
| A click on the Filter button at the bottom of the logbook allows you to enter the filter mode. In this mode, you have the possibility to speicify the values that must take the fields Observer, Location, Target object, Target name, Constellation, Observation type, Mount, Telescope, Camera, Eyepiece and Filters. It is possible to specify a range of dates that the logbook entries to be displayed must satisfy. Once the filter is set, the filter mode can be exited by clicking again on the same button. Since C2A uses the SQLite database engine to store the logbook data, it is possible to specify the different text fields of the filter using the usual SQL wildcards: % is a substitute for zero or more characters, _ (underscore) is a substitute for exactly one character, [charlist] is any single character in charlist, [^charlist] is any single character not in charlist. For instance, if you specify NGC% in the field Target Object, all the objects for which the refererence name starts with NGC will be displayed in the logbook entry list. For more information about SQL wildcards, see: http://www.w3schools.com/sql/sql_wildcards.asp. The screen capture on the right shows how the logbook window looks like when the filter mode is activated. |
|
The Def. button lets you edit the default values for the fields when a new entry is created into the logbook. In this mode, it is possible to specify the default values for the fields Observer, Location, Observation Type, Mount, Telescope, Camera, Eyepiece and Filters. These default values save you time when creating an entry where these fields are essentially the same.
All the text field into the logbook interface are limited to 63 characters, except for the Weather Conditions (1023 characters) and the Notes (8191 characters). Some of the text zones have a small button next to them with a small arrow. This button lets you pick an exisiting value for that field in the database. This is handy in many situations where you just want to reuse an existing value for one of these fields such a the mount or camera descriptions.
Two buttons at the bottom of the screen let you export one or several logbook entries into a PDF file in order to share the logbook entries. Three other buttons let you duplicate a logbook entry while keeping more or less information from the current entry during that process. Finally, the small button with the disk on it allows you to perform a backup of the logbook database. The database is simply copied into the same folder while adding at the beginning of the file name the current date and time under the form "yyyy_mm_dd_hh_mm_ss". This function lets you create on a regular basis backup copies of your logbook in order to get protected against an accidental deletion or corruption of the database. It must be noted that the folder which stores the database can be changed into the Paths tab of the Options dialog box (which can be accessed from the main C2A window with the F7 keyboard shortcut). The name of the database file that contains all the logbook data is Logbook.sqlite. It is advised to create copies of that file on a regular basis and to store them on an external disk.
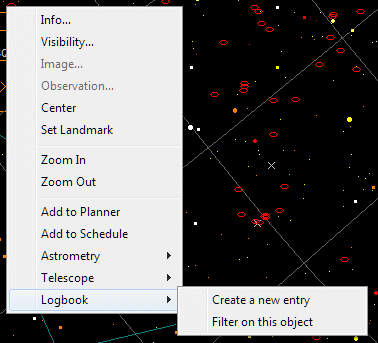
Usage of the logbook is quite intuitive and should be quickly mastered. The logbook can be opened using the command Observation Logbook... from the Tools menu (SHIFT+Ins is a shortcut for this command) or by performing a right-click with the mouse on an object in the map. In that second case, the contextual menu lets you access a Logbook sub-menu with two entries: Create a new entry allows to to quickly insert a new entry into the logbook with all the object information pre-filled; Filter on this object applies automatically a filter in the logbook with the selected objet reference name. The screenshot below shows you the Logbook contextual menu.

When creating a new entry from the contextual menu, the current date and time of the map are used to specify the observation starting time.