How do you Use the Setting Circles Function?
When an object is identified, a dialogue box is displayed
which brings together several pieces of information about the object (see the
section Object information window).
Note that you do not get this dialog box when the Control Panel is operational
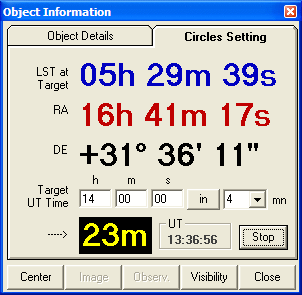
and when it include the object information fields. In this dialogue box, there
is a tab which lets access the setting circles function. The image below shows
the setting circles interface.

The purpose of this tool is to allow you to point the
telescope at an object in a simple manner. The idea is to preset the hour angle
and declination of the telescope and then to begin tracking at a time specified
by the tool. To use this method the following conditions must be met:
- The telescope must have an aligned
equatorial mount.
- The mount must have sufficiently precise
hour angle and declination circles.
- The hour circle must be adjustable, that
is it must be unlockable and to rotate independently of the telescope.
- Sidereal tracking of the telescope must be able to be started quickly, for example by pressing a button.
This is how to use the function:
- Begin by identifying the object you want
to point at in the map displayed by C2A. An object is identified by
double-left-clicking on it. When the object information window is
displayed (make sure that the Control Panel is not displayed in the main
window), select the “setting circles” tab. Note that C2A memorises the
selected tab so that it will be displayed immediately on the next
identification.
- Next, specify the time at which you want
tracking to start. This point must be chosen to give time to adjust the
telescope setting circles. To set this time, just fill in the three fields
"h", "m" and "s" in the dialogue box. A more
convenient method is to click the “in” button after you have selected a
number of minutes between the target time and current time. You might, for
example, select “3 minutes” from the drop-down list if you wanted to
launch tracking three minutes later, this would give you enough time to
adjust the setting circles (you could use a different length of time
depending on your efficiency in setting the circles).
- Once the target time has been set, just
click the “start” button to launch the count down. The time remaining
before tracking starts is then displayed as a yellow number and the
“start” button is renamed “stop” (the button to use if you want to stop
the process).
- Then adjust the telescope’s declination
and hour angle circles. First, unlock the hour circle and turn it so that
the Local Sidereal Time is on the South Meridian (i.e. you must
align the Local Sidereal Time with the south meridian index mark). Lock
the hour circle and turn the Alpha axis of the telescope mount so that the
right ascension displayed in the dialogue box is coincident with the
meridian index. Finally, move the telescope in declination so that the
declination circle corresponds with the declination shown in the dialogue
box.
- Having positioned the telescope, wait
until the end of the count down. When the count down reaches 0, the
display turns red and a bleep sounds. This signal the time to start
sidereal tracking of the Alpha axis. The telescope should then be exactly
on and tracking the object sought.
This method needs a bit of practice, but is usually very effective.
Table of Contents

